.NET Aspire Support For An XAF Blazor Project — Custom Telemetry, Service Orchestration, Database Dependency

In a recent blog post I described how an XAF Blazor project can be adjusted to support .NET Aspire. With a couple of changes to the startup logic, in both the standard XAF project template and the code added by the Aspire Visual Studio wizard, it became possible to run the XAF Blazor project as part of an Aspire orchestration - but it was the smallest possible orchestration, with just one module!
As promised, I will demonstrate a few more aspects of the Aspire based project structure. I’m leaving deployment considerations for a third post (watch out for it in the near future!), but below I’ll describe the changes I made to the sample project for the following three scenarios:
- Log custom activities and metrics through Open Telemetry to the Aspire Dashboard
- Make SQL Server a dependency which runs in a container coordinated by Aspire
- Add an extra service to the orchestration to illustrate a slightly more complex application system
The complete sample project is available in this GitHub repository. Based on the state I described in the first blog post, please read on for details of the new functionality.
Utilize the Open Telemetry Support for Custom Application Metrics and Activities
The integration of the Aspire dashboard is one of the most obvious new features in many application projects, right after integrating Aspire. As you have seen in the first step of the demo project, it is easy to activate various default sources for tracing and metrics. After that the question quickly becomes: how do you use the telemetry system for your own needs, for logging and reporting your own metrics and activities?
As a first step, I created the file
XafAspireDemo.Blazor.Server/Controllers/ImportantBusinessOperationsController.cs, with a basic implementation of an XAF controller that
supplies an action. This action becomes visible in the UI
automatically, so you can use it as an interactive test
trigger. Here’s the code:
namespace XafAspireDemo.Blazor.Server.Controllers
{
    public class ImportantBusinessOperationsController : Controller
    {
        SimpleAction importantBusinessAction;
        IServiceProvider serviceProvider;

        public ImportantBusinessOperationsController()
        {
            importantBusinessAction = new SimpleAction(
                this,
                "ImportantBusinessAction",
                PredefinedCategory.View
            );
            importantBusinessAction.Execute += ImportantBusinessAction_Execute;
        }

        [ActivatorUtilitiesConstructor]
        public ImportantBusinessOperationsController(IServiceProvider serviceProvider)
            : this()
        {
            this.serviceProvider = serviceProvider;
        }

        private async void ImportantBusinessAction_Execute(
            object sender,
            SimpleActionExecuteEventArgs e
        )
        {
            var logger = serviceProvider.GetRequiredService<
                ILogger<ImportantBusinessOperationsController>
            >();

            importantBusinessAction.Enabled["ImportantBusinessActionRunning"] = false;

            logger.LogInformation("ImportantBusinessAction started.");

            try
            {
                // This is where we perform the magic for the important business action.
                // Run a task that waits a random time between half a second and five seconds.
                await Task.Run(() =>
                {
                    Thread.Sleep(new Random().Next(500, 5000));
                });
            }
            catch (Exception ex)
            {
                logger.LogError(ex, "ImportantBusinessAction failed.");
                throw;
            }
            finally
            {
                importantBusinessAction.Enabled["ImportantBusinessActionRunning"] = true;
            }
        }

        protected override void OnActivated()
        {
            base.OnActivated();

            var logger = serviceProvider.GetRequiredService<
                ILogger<ImportantBusinessOperationsController>
            >();
            logger.LogInformation("ImportantBusinessOperationsController activated.");
        }

        protected override void OnDeactivated()
        {
            var logger = serviceProvider.GetRequiredService<
                ILogger<ImportantBusinessOperationsController>
            >();
            logger.LogInformation("ImportantBusinessOperationsController deactivated.");

            base.OnDeactivated();
        }
    }
}
As you can see, this code is already instrumented with some log
output instructions. It uses the standard
ILogger<T> interface that is
part of .NET, coupled with constructor injection with
IServiceProvider, which is
preferred by XAF to retrieve the injected service in the
controller implementation.
The logging functionality supplied by the ASP.NET Core infrastructure integrates with the Aspire Dashboard automatically. With the above changes, you can run the application and click the Important Business Action button. The implementation disables the button for a random duration and outputs log lines during initialization and on startup of the interactive process. In the Aspire Dashboard, the Structured Logs page displays this output.


Now, in order to record Open Telemetry activities and work with meters, these objects need to be initialized on application startup, and any code that should interface with the generated objects must be able to retrieve them. This could be achieved by a global singleton implementation, for example, but in the demo app it makes more sense to take advantage of dependency injection again and let it handle the singleton aspect.
Here is the implementation of the class
XafAspireDemo.Blazor.Server.Telemetry:
namespace XafAspireDemo.Blazor.Server
{
    public class Telemetry : IDisposable
    {
        public ActivitySource ActivitySource { get; }
        public Meter Meter { get; }
        public string MeterName => Meter.Name;
        public Counter<long> ImportantBusinessOperationCounter { get; }
        public Histogram<double> ImportantBusinessOperationDuration { get; }

        public Telemetry(
            string serviceName = "XafAspireDemo.Blazor.Server",
            string version = "1.0.0"
        )
        {
            ActivitySource = new ActivitySource(serviceName, version);
            Meter = new Meter(serviceName, version);

            ImportantBusinessOperationCounter = Meter.CreateCounter<long>(
                "important_business_operation.execution_count"
            );
            ImportantBusinessOperationDuration = Meter.CreateHistogram<double>(
                "important_business_operation.execution_duration"
            );
        }

        public void Dispose()
        {
            ActivitySource.Dispose();
            Meter.Dispose();
        }
    }
}
The types ActivitySource, Meter,
Counter<T> and Histogram<T> are
all from the System.Diagnostics.Metrics namespace.
The class simply instantiates these on startup and disposes of
them when the application run ends. Now you just need a few
lines to create an instance and register it as a singleton for
dependency injection. Of course other patterns are possible,
but this approach is convenient for the structure of the demo.
This code goes in
XafAspireDemo.Blazor.Server/Startup.cs:
    builder.AddEntityFrameworkCoreInstrumentation();
});

--> var telemetry = new Telemetry();
--> services.AddSingleton(telemetry);

--> services
-->     .AddOpenTelemetry()
-->     .WithTracing(tracing => tracing.AddSource("XafAspireDemo.Blazor.Server"))
-->     .WithMetrics(metrics =>
-->     {
-->         metrics.AddMeter(telemetry.MeterName);
-->     });

services.AddSingleton(
    typeof(Microsoft.AspNetCore.SignalR.HubConnectionHandler<>),
What remains is to use the new features in the sample
controller. I added a few lines to the execution handler for
the ImportantBusinessAction:
private async void ImportantBusinessAction_Execute(
    object sender,
    SimpleActionExecuteEventArgs e
)
{
-->    var telemetry = serviceProvider.GetRequiredService<Telemetry>();
    var logger = serviceProvider.GetRequiredService<
        ILogger<ImportantBusinessOperationsController>
    >();

    importantBusinessAction.Enabled["ImportantBusinessActionRunning"] = false;

-->    using var activity = telemetry.ActivitySource.StartActivity("ImportantBusinessAction");
    logger.LogInformation("ImportantBusinessAction started.");

    try
    {
		...
    }
    catch (Exception ex)
    {
        logger.LogError(ex, "ImportantBusinessAction failed.");
-->        activity?.SetStatus(ActivityStatusCode.Error);
-->        activity?.AddException(ex);
        throw;
    }
    finally
    {
-->        activity?.Stop();

        importantBusinessAction.Enabled["ImportantBusinessActionRunning"] = true;

-->        telemetry.ImportantBusinessOperationCounter.Add(1);
-->        telemetry.ImportantBusinessOperationDuration.Record(
-->            activity.Duration.TotalMilliseconds
-->        );
    }
}
At the top of the method, the reference to the singleton is
retrieved from dependency injection, just like the
ILogger<T>. An activity is started near the top
of the method, and further code below adds details to this
activity if an error occurs, and uses the activity’s
Duration property to figure out how long the
process ran. The two meter elements
ImportantBusinessOperationCounter and
ImportantBusinessOperationDuration are modified to
include details about the current run.
With these elements in place, the Aspire Dashboard now displays the new metrics and activities when the business operation is executed. Note that a link is also generated between a meter entry (for instance a duration record) and the corresponding activity - the Open Telemetry system is clever and handles much of this automatically.


Add SQL Server as a Container Dependency
One of the best things about Aspire is that it can handle
infrastructure dependencies of your application system for you.
There are numerous NuGet packages by now, usually named
starting with Aspire.Hosting., which provide
wrappers to interface with specific architectural components.
One such component is SQL Server, and as expected the package
Aspire.Hosting.SqlServer makes this available.
Note that the NuGet package reference needs to be added to the
project XafAspire.AppHost, since this is where the
SQL Server instance will be configured as part of the
orchestration!
A second note: to run containers as part of an Aspire orchestration, you need to have a container runtime installed. Please check out this Microsoft documentation page in case you need help with this step.
To declare that the orchestration requires a SQL Server
component, and that it will be a dependency for the Blazor
Server process, all you need are a few lines of code in the
file XafAspireDemo.AppHost/Program.cs:
var builder = DistributedApplication.CreateBuilder(args);

--> var sql = builder.AddSqlServer("sql")
-->    .WithLifetime(ContainerLifetime.Persistent);

--> var db = sql.AddDatabase("XafAspireDemoDb");

builder
    .AddProject<Projects.XafAspireDemo_Blazor_Server>("xafaspiredemo-blazor-server")
    .WithHttpsEndpoint()
-->    .WithReference(db)
-->    .WaitFor(db);

builder.Build().Run();
First, the call to AddSqlServer establishes the
component of the orchestration for your application system. The
call WithLifetime(ContainerLifetime.Persistent) is
often useful in development, because the container would
otherwise be started and stopped with each run of the
application system, which results in loss of any test data.
With the Persistent parameter, the container is
left running when the rest of the application system stops,
which speeds up the next run and retains data.
The database reference for a demo database is passed through to
the Blazor Server project, and the WaitFor call
makes sure that the database is ready for action before the
Blazor Server app attempts to access it.
That’s all it is on the orchestration side! It’s interesting that this approach to working with SQL Server does not need you to understand anything about connection strings and other specific details, for the first time in SQL Server history!
Nevertheless, of course we need to find out how the Blazor
Server app connects to the new dependency now. Aspire has some
automatic handling that finds out how the container with SQL
Server can be contacted, and it provides a connection string
automatically in an environment variable. The name of that
variable is constructed similar to those environment variables
that overload configuration file content, and it incorporates
the name of the database in the setup. For the code above, the
environment variable name is
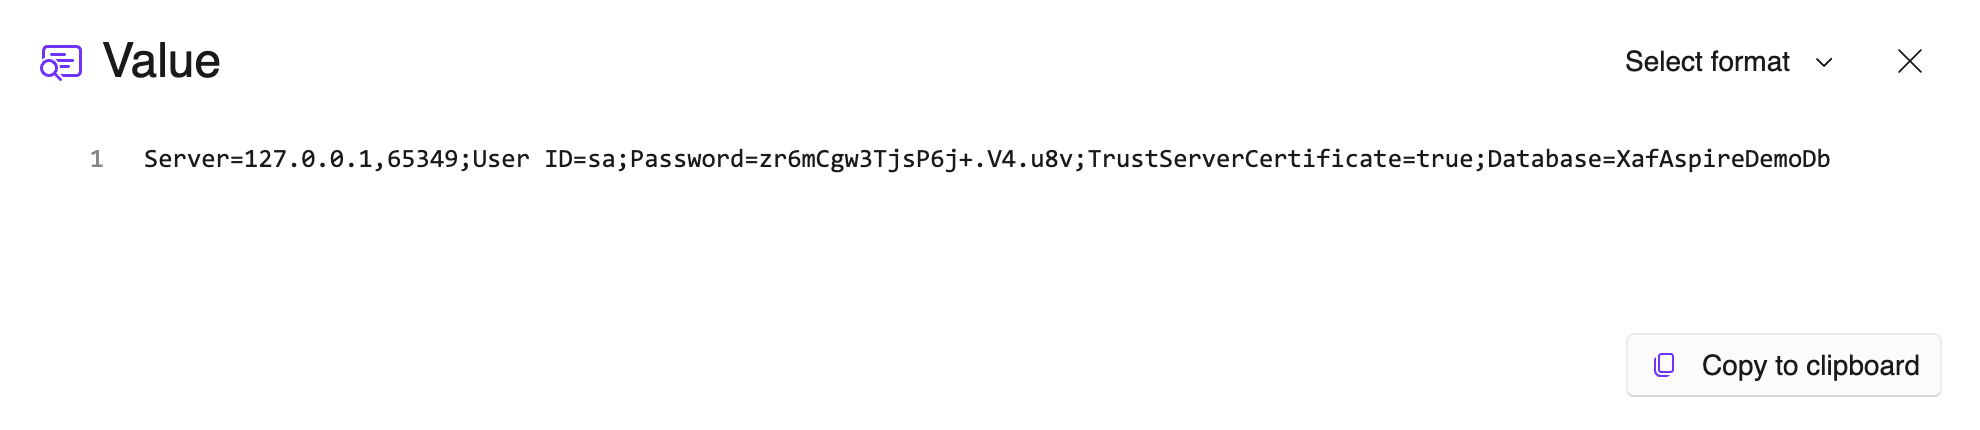
ConnectionStrings__XafAspireDemoDb.
By running the application at the current point, keeping in mind that the connection to the new containerized database is not being used yet, you can see that a SQL Server container is started (for example in Docker Desktop), and that the dashboard displays the new dependency correctly. The environment variable with the connection string is also visible in the dashboard.


The connection string includes a local port number, which is
served by a proxy service provided by Aspire. The password for
the database user sa is auto-generated by the
Aspire adapter.
One change is now missing to allow the Blazor Server app to use
the containerized SQL Server. Edit the file
XafAspireDemo.Blazor.Server/Startup.cs and find
the block in the ConfigureServices method where
the connectionString is assigned. In the default
XAF template, the code loads the connection string by calling
Configuration.GetConnectionString. Replace this
code with a simple evaluation of the environment variable:
    //options.UseInMemoryDatabase("InMemory");

    // The environment variable is published by the Aspire Host
-->    string connectionString =
-->        Environment.GetEnvironmentVariable("ConnectionStrings__XafAspireDemoDb");

#if EASYTEST
    if (
        Configuration.GetConnectionString("EasyTestConnectionString")
Now you can run the application again, and the SQL Server in the container will be used instead of any other instance you used before.
A little bit more…
One of the great details about setting your project up to use infrastructure containers is that other devs can easily execute the project on their machines without having to prepare their environment. For example, I was able to run the complete demo solution on my Mac at this point! There are two details I’d like to bring up in this regard.
First, I simply used
dotnet run --project XafAspireDemo.AppHost on the
Mac, and there was a surprisingly large number of warnings and
errors as soon as I tried to do anything in the dashboard. It
turned out that this happened because I had not explicitly
trusted the dev-time HTTPS certificates generated by .NET. This
is usually not a big deal in my experience, it just leads to
the occasional warning, but the Aspire Dashboard seems to rely
on these certificates to a much greater extent for its gRPC
connections.
You can read all about using HTTPS with ASP.NET Core
in this Microsoft documentation, and the simple command
dotnet dev-certs https --trust establishes the
necessary trust and the gRPC connection issues go away.
Second, when running without a debugger attached, the standard behavior of XAF changes with regard to automatic database schema updates and updater execution. In a production deployment, you would deal with this as described in the XAF documentation here, but for my dev purposes I decided to extend the automatic update mechanism to cover the Aspire scenario I was using.
I edited the file
XafAspireDemo.Blazor.Server/BlazorApplication.cs,
which includes a line where the environment is checked for an
attached debugger - if this is found, an automatic update is
executed. I extended this line to accept an environment
variable as an alternative:
--> if(Environment.GetEnvironmentVariable("ASPIRE_DEBUG") != null || System.Diagnostics.Debugger.IsAttached) {
    e.Updater.Update();
    e.Handled = true;
}
Now I modified the Aspire host startup logic in
XafAspireDemo.AppHost/Program.cs to set this
variable on startup:
builder
    .AddProject<Projects.XafAspireDemo_Blazor_Server>("xafaspiredemo-blazor-server")
-->    .WithEnvironment("ASPIRE_DEBUG", "true")
    .WithHttpsEndpoint()
    .WithReference(db)
    .WaitFor(db);
With these changes in place, the demo solution now runs perfectly on my Mac!
Orchestrate Additional Application Services
So far, the orchestration has two parts: the SQL Server and the Blazor Server app. I’ll add an extra service to the application system now, which will be called from the test controller in the Blazor app.
I start by creating a new project and adding it to the
solution. Then I add a reference to the project
XafAspireDemo.ServiceDefaults to the new project,
and a reference to the new project to the project
XafAspireDemo.AppHost.
> dotnet new webapi -n XAFAspireDemo.DemoService

> dotnet sln add XAFAspireDemo.DemoService/XAFAspireService.DemoService.csproj

> dotnet add XAFAspireDemo.DemoService/XAFAspireService.DemoService.csproj reference XafAspireDemo.ServiceDefaults/XafAspireDemo.ServiceDefaults.csproj

> dotnet add XafAspireDemo.AppHost reference XAFAspireDemo.DemoService/XAFAspireService.DemoService.csproj
I add a class Telemetry to the new service
project, similar to the one in the Blazor Server project, but
using its own identifiers and names.
using System.Diagnostics;
using System.Diagnostics.Metrics;

namespace XafAspireDemo.DemoService
{
    public class Telemetry : IDisposable
    {
        public ActivitySource ActivitySource { get; }
        public Meter Meter { get; }
        public string MeterName => Meter.Name;
        public Counter<long> ImportantBusinessValueRetrievalCounter { get; }
        public Histogram<double> ImportantBusinessValueRetrievalDuration { get; }

        public Telemetry(string serviceName = "XafAspireDemo.DemoService", string version = "1.0.0")
        {
            ActivitySource = new ActivitySource(serviceName, version);
            Meter = new Meter(serviceName, version);

            ImportantBusinessValueRetrievalCounter = Meter.CreateCounter<long>(
                "important_business_value.retrieval_count"
            );
            ImportantBusinessValueRetrievalDuration = Meter.CreateHistogram<double>(
                "important_business_value.retrieval_duration"
            );
        }

        public void Dispose()
        {
            ActivitySource.Dispose();
            Meter.Dispose();
        }
    }
}
I replace the template code in
XAFAspireDemo.DemoService/Program.cs with this:
using XafAspireDemo.DemoService;

var builder = WebApplication.CreateBuilder(args);

builder.Services.AddEndpointsApiExplorer();
builder.Services.AddOpenApi();

builder.Services.AddAspireServiceDefaults();
builder.Services.ConfigureOpenTelemetry(builder.Configuration, builder.Environment);

var telemetry = new Telemetry();
builder.Services.AddSingleton(telemetry);

builder
    .Services.AddOpenTelemetry()
    .WithTracing(tracing => tracing.AddSource("XafAspireDemo.DemoService"))
    .WithMetrics(metrics =>
    {
        metrics.AddMeter(telemetry.MeterName);
    });

var app = builder.Build();

if (app.Environment.IsDevelopment())
{
    app.MapOpenApi();
}

app.UseHttpsRedirection();

app.MapGet(
        "/important-business-value",
        (Telemetry telemetry) =>
        {
            using var activity = telemetry.ActivitySource.StartActivity(
                "ImportantBusinessValueRetrieval"
            );

            var importantBusinessValue = Random.Shared.Next(1, 10000);

            telemetry.ImportantBusinessValueRetrievalCounter.Add(1);

            if (activity != null)
            {
                activity.Stop();
                var durationMs = activity.Duration.TotalMilliseconds;
                telemetry.ImportantBusinessValueRetrievalDuration.Record(durationMs);
            }

            return Results.Ok(new { ImportantBusinessValue = importantBusinessValue });
        }
    )
    .WithName("GetImportantBusinessValue")
    .WithOpenApi();

app.MapDefaultAspireDevEndpoints();

app.Run();
This is all familiar code by now, just a few details to point out:
-
The helpers
AddAspireServiceDefaults,ConfigureOpenTelemetryandMapDefaultAspireDevEndpointsare shared with the Blazor Server project for consistency - The startup pattern is very similar to that used in the Blazor Server app as well
-
The implementation of the handler for the
/important-business-valueendpoint uses the same patterns for the activity and the meters as the code in the sample controller of the Blazor app.
Now I modify the file
XafAspireDemo.AppHost/Program.cs to add the new
project to the orchestration. Note that I change the existing
call to WithHttpsEndpoint to pass an explicit name
- Aspire doesn’t like more than one parameterless call because
it doesn’t assign auto-generated names.
...
var db = sql.AddDatabase("XafAspireDemoDb");

--> var demoService = builder
-->     .AddProject<Projects.XAFAspireDemo_DemoService>("demoservice")
-->     .WithHttpsEndpoint(name: "demoservice-https");

builder
    .AddProject<Projects.XafAspireDemo_Blazor_Server>("xafaspiredemo-blazor-server")
    .WithEnvironment("ASPIRE_DEBUG", "true")
-->   .WithHttpsEndpoint(name: "xafaspiredemo-blazor-server-https")
    .WithReference(db)
-->   .WithReference(demoService)
    .WaitFor(db);
To call the new service from the test controller, I need to
make an HTTP client available to it. I modify
XafAspireDemo.Blazor.Server/Startup.cs and add
this line:
...
services.ConfigureOpenTelemetry(Configuration, WebHostEnvironment);

--> services.AddHttpClient();

services.ConfigureOpenTelemetryTracerProvider(builder =>
...
Now I can use the HTTP client to call the service from the
controller in
XafAspireDemo.Blazor.Server/Controllers/ImportantBusinessOperationsController.cs.
...
	{
	    Thread.Sleep(new Random().Next(500, 5000));
	});

--> 	var httpClientFactory = serviceProvider.GetRequiredService<IHttpClientFactory>();
--> 	var httpClient = httpClientFactory.CreateClient();
--> 	var response = await httpClient.GetFromJsonAsync<ImportantBusinessValueResponse>(
--> 	    "https://demoservice/important-business-value"
--> 	);
--> 	logger.LogInformation(
--> 	    "Received important business value from service: {ImportantBusinessValue}",
--> 	    response?.ImportantBusinessValue
--> 	);
}
catch (Exception ex)
{
...
An interesting detail: the URL for the service request uses the
hostname demoservice. This is possible because the
host configures the service as a dependency. As a consequence,
DNS resolution for the Blazor Server allows access to this name
and resolves it to the target service.
That completes the changes! When I run the application now, the Aspire Dashboard shows the new structure. The log output includes items from the new service now, the metrics are included (select the correct resource to see them!), and since the service endpoint reports its own activities, you also see nested activities in the Traces page now.


Your Feedback Matters!
In the final upcoming part of this small series, I will go into some deployment scenarios for this GitHub sample. As always, please send your feedback about Aspire, our plans or your existing and future uses of Aspire — thanks to all of you who have already done that! — and any questions or ideas, we will attempt to consider everything!
Free DevExpress Products - Get Your Copy Today
 Oliver Sturm (DevExpress)